Friday, October 14, 2011

Apple Hacks: 39 Apple Recipes, Games, Activities, and Crafts

This piece comes from October 2007, which was nice when you think about it.

The U.S. produced more than 9,816,000,000 pounds of apples last year, or just about 28,854,000,000 individual pieces of fruit. That’s a lot of apples. Maybe too many to eat.

Fortunately, there are dozens - no, hundreds - wait, THOUSANDS of other uses for those delightful orbs of deliciousness, and CHG has 43 of ‘em right here.

1. Predict your romantic fortune. According to USApple.org, throwing an apple peel over your shoulder could reveal the identity of a boyfriend-or-girlfriend-to-be, since it, “would form the initial of your lover’s name.” I’m guessing X and Q don’t show up much.

2. Practice your pumpkin carving. Test-whittle a pumpkin pattern on its smaller, cheaper fruit cousin, and you’ll make fewer mistakes when it’s showtime.

3. Teach someone how to bunt. One of baseball’s most overlooked skills is also one of its most important, especially if you’re into squeeze plays. But bunting too hard is a surefire way to waste an out. At your team’s next practice, toss apples to your bunters-in-training. If the fruit gets smashed, the kids are using unnecessary force. If the apples fall and roll away unharmed, they’re halfway to Butlerville.

4. Play a Flexibility game. This is an easy, creative brain exercise revered by one of my favorite elementary school teachers. Place an apple in front of a few kids. Give them ten minutes to come up with as many non-food uses as possible. The winner gets the apple. (And gets to write a blog entry twenty years later about the many uses of apples.)

5. Practice magic. Nourish your inner Harry Blackstone with the good ol’ Orange to an Apple trick. (Scroll down for details.)

6. Shrink some heads. Both hideously effective and just plain hideous, shrunken apple heads are guaranteed to scare the beejeezus out of someone this Halloween. Fab Foods has instructions.

7. Exfoliate. Wikihow gives DIY instructions on a neat facial scrub. Make sure you’re not allergic before giving it a try. That would be bad.

8. Prevent every disease known to man. Apples’ health benefits are too numerous and mind-boggling, to list here, so I’ll let’s hand it over to the Apple lobby.

9. Teach a student driver how to accelerate and brake smoothly. The apple’s stable bottom and heavy top makes it a perfect balance tool. Place one on top of the driver’s car. In an unoccupied parking lot, have him speed up, speed down, and finally, brake. If the apple’s knocked off, he loses. If it stays on, it’s apple pie for all.

10. Soften brown sugar. Oh, Reader's Digest, you crafty minx. I had no idea it was possible to do this: “place an apple wedge in a self-sealing plastic bag with the chunk of hardened brown sugar. Tightly seal the bag and put it in a dry place for a day or two. Your sugar will once again be soft enough to use.” Now, if you could only improve that joke page…

11. Facial! According to the Washington Post, apples make people look pretty. Mix a grated one with a little honey and apply it to your face. Poof! Instant beauty. (Or at least, a very tasty visage.)

12. Stick ‘em in a vase. Pretending you’re on Trading Spaces has never been so easy. Grab a dozen Granny Smiths, pile them in a clear, tall container, and place strategically. Instant class for less than $4.

13. Make a stamp. Apples make great (albeit temporary) decorative stamps. Whether it’s cards, letters, or wrapping paper, the Washington Post claims all you have to do is, “[Slice] the fruit horizontally, exposing the inside star shape. Or create more elaborate designs -- hearts, moons, Hitchcock's profile -- with a small knife. Then stick a fork in the rounded side of the fruit, dip it in paint and press the stamp on paper.”

14. Host an apple tasting. From Lifehacker: Buy a dozen or so different apples, invite some friends over, and eat. Pair with wine, cheese, and/or chocolate for the ultimate in inexpensive luxury.

15. Ripen a tomato. Take five under-ripe tomatoes and one ripe apple. Place in a paper bag. Wait a few days. Marvel at the results.

16. Learn to Juggle. Over a couch or couch-like surface, preferably.

17. Treat a horse, rabbit, or turtle. People aren’t the only animals that dig a nice MacIntosh. Head to your nearest stable or petting zoo, and (with the permission of the owners) make a mammal and/or amphibian happy. Especially fun with kids. (Make sure to shred the fruit before feeding it to a turtle. Otherwise, Choke City.)

18. De-salt a dish. Oversalting is a ginormous problem for those of us who prefer our sodium intake on the tongue-withering side. Reader's Digest says, “When you find yourself getting heavy-handed with the saltshaker, simply drop a few apple (or potato) wedges in your pot. After cooking for another 10 minutes or so, remove the wedges -- along with the excess salt.” Chemistry at work!

19. Make stuff smell good. Huge props to Meredith at Like Merchant Ships on this one. She simmers a few apples along with various spicery, and her house ends up more fragrant than a Pillsbury factory. NICE. Instructions included in the link.

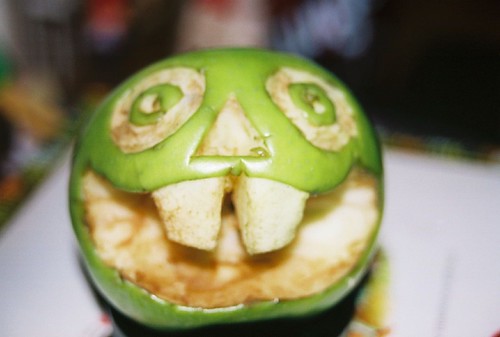
20. Build apple animals. Grab some toothpicks, a few gum drops, a handful of marshmallows and go to town. They make inspired, bizarrely fun holiday decorations, especially for Halloween and Thanksgiving.

21. Support some candles. I wish I’d thought of this one. Instead, Reader's Digest trumped me again. You rascally malcontents! “Use an apple corer to carve a hole three-quarters of the way down into a pair of large apples, insert a tall decorative candle into each hole, surround the apples with a few leaves, branches, or flowers.”

22. Create an apple-head doll. Hey! It’s a doll that, uh, ages. (Yay?) I’m not so sure how I feel about this one, but (once again) the Washington Post seems to think it’s a good idea: “Peel an apple and let it hang-dry for a couple of days, so that the fruit shrivels into an old-lady face. Decorate the face with wire (for granny glasses) and seeds (for beady eyes), and attach it to a small bottle for the body. Dress up.”

23. Save the cakes! Storing a cake with half an apple will keep it alive for days longer than its projected lifespan. See, the apple absorbs all the mold-breeding moisture, leaving the confection nearly as fresh as the day it was baked. (I would say, “yummo” here, but honestly, that word makes me homicidal.)

24. Juice up a chicken. Marcella Hazan does this, but with lemons. 1) Grab a roaster chicken. 2) Stick an apple up its butt. 3) Roast. 4) Enjoy your a dewy, drippingly moist bird. Reader’s Digest has more.

25. Bob for them suckers. Oh, it looks easy enough, but Bobbing for Apples is the "Stairway to Heaven" of Halloween party games: only the chosen ones are really good at it.

26. Teach math and/or the fundamentals of gravity. According to some studies, kids respond better to hands-on lessons than those learned by rote memory. Apples are good tools for teaching addition, subtraction, and basic Newtonian physics. (Plus, is there anything more entertaining than dropping fruit on childrens’ heads?)

27. Decorate a Christmas tree. String some garland or build your own ornaments. If you have a dog or particularly bizarre cat, just remember to place ‘em high up.

28. Practice your knife skills. Whether you’re peeling its skin, coring the center, or chopping it up into eraser-sized pieces, the apple is one of the few foods suited for both pairing and chef’s knives. Hone your technique on a few dozen Cortlands (and use the detritus in applesauce).

29. Jazz up a floral arrangement. For your next bouquet, think outside the flower box by adding one or two color-coordinated apples to the party. Meredith has a great example over here.

30. Kiss up to a teacher. If your wife, husband, sister, roommate, uncle, best friend, or second cousin by marriage twice removed is about to launch a teaching career, slip a Red Delicious into their lunchbox with a note. They’ll mist up in the cafeteria.

31. Devise a centerpiece. Stack ‘em, line ‘em up, or stick ‘em in a bowl – anyway you position them, apples are elegant, easy objets d’art in any mealtime setting.

32. Play Pass the Apple. A super-neat variation on the ol’ fashioned relay race, Pass the Apple involves each runner tucking a piece of fruit under his chin, then transferring it to the next runner’s chin without using his hands.

33. Carve a bird. Fruit sculpture is impressive and fairly easy when compared to other hobbies, like say, quantum physics. This apple bird tutorial will get you started.

34. Give a gift. Whether you’re canning or making Apple Pie in a Jar, every person on the face of the earth (except Kim Jong Il and other various psychopaths) loves receiving food for special occasions. Homemade apple products are an inexpensive way to please minds, hearts, and gaping maws.

35. Target practice. Do you shoot things at other things? Save money (and perhaps someone’s eye) by setting apples up as bulls-eyes. On the less-destructive side, they also make fabulous targets for practicing your curveball. (PLEASE BE CAREFUL.)

36. Paint. There’s a reason so many painters start on bowls of fruit – it’s a good way to learn fundamental shading and coloring. Unpack those brushes and get started, folks.

37. Design a wreath. At first, I pictured this as a dozen apples affixed to a straw circlet, rotting over my mom’s mantle. Ooo – wrong. FamilyCorner.com has a good example of how it should really be done.

38. Play apple toss. It’s like cornhole, but with buckets. And apples. And no bean bags. And … ah, just take a look.

39. Cook. This would be a pretty awful cooking blog if there was no actual cooking involved. So, BEHOLD the following light, relatively inexpensive recipes, garnered from Cooking Light, Food Network, Pick Your Own, All Recipes, and my Ma:
Apple Brown Betty
Apple Butter
Apple Cake


Sources:

Tuesday, September 27, 2011

that thing i'm writing

that thing i'm writing

Wednesday, September 14, 2011

My Dinner with Aline

This post was written by Leigh, who usually pens CHG's Veggie Might column.

Greetings darling CHG readers! I've missed you ever so. The most exciting thing happened since I was here last. I went to Rwanda to teach crochet to the girls of the Ubushobozi Project, and I'm bursting with joy to share with you a first-hand account of your generosity in action.

You may recall that Ubushobozi is a vocational training center that teaches at-risk teenage girls sewing and life skills that set them on a path of empowerment and self-sufficiency. Students are provided lessons, materials, a sewing machine, a salary and a daily meal, health care for themselves and members of their households, and so much more. They learn to be independent, how to run a business by selling the tote bags and clothes they make, and that people are invested in them and their success.

And they dance…do they ever dance!

Back in the spring, Kristen and I introduced you to Aline, who was in particular need of a kitchen. Aline studies and works at Ubushobozi to support her two sisters and ensure the youngest, Diana, gets the formal education not afforded to Aline and Olive, the older sister.


The sisters' house was in disrepair. The roof leaked, the windows had no shutters, the door had no locks, and of special interest to the CHG community, the house had no kitchen. The girls cooked on a charcoal stove outside in the elements rain or shine, and when the rain was too much to light a fire, they took their cook pot to a neighbor or, as often, went without supper. You rallied to Aline's aid and quickly raised $200 so Aline and her sisters could build a new kitchen.

Immediately, after the fundraiser in March, a terrible rainstorm took off Aline's leaky roof and damaged the walls of her house. With our blessing, the Ubushobozi directors allowed Aline to use the kitchen money to make emergency repairs to her roof and walls, and as soon as the rains passed, replenished the kitchen money from the general fund.

Cut to August: Aline has one of the swankiest houses in her village, with doors that lock and everything.


On my visit, our crew, that included me, directors Betsy and Dolinda, and founder Jeanne, rode on motorcycle taxis (oh dear Maude, I thought I was going to die) to the girls' village to check out their digs. Our first stop was Aline's house. The village was immediately abuzz with the news that "mzungus" (non-Africans) had arrived.


Escorted by a number of small children from the village, Betsy and I almost burst into tears when we saw Aline's house. The crumbling mud bricks we'd seen in photos were smoothed over with an adobe-like clay. A new tin roof gleamed in the sun. Doors and shutters were obviously new, with shiny locks to protect the girls at night. Diana took us around back.

There it was: Aline's kitchen, a brand-new mud-brick structure standing fresh and bright among the banana trees and bean poles. It had ventilation windows near the roof and a stone floor. Since it was the dry season, the stove was still outside, but the kitchen stood ready to withstand the rains to come—the rains that are pounding them now.


Aline poked her head from inside the house, just emerging from a bath.

"One minute," she said smiling, and popped back inside. A few minute later, she joined us outside, draped in vibrant fabric, showing off her kitchen and posing for pictures. She disappeared again and Diana led us to the living room.

Their tiny house was neat and tidy. The only light came through the high windows. We sat in wicker chairs around a wooden coffee table and chatted and laughed with Diana and Faustin, Ubushobozi's gardener, who also lives in the village. We marveled at all the work that had been done. After about 30 minutes, Aline finally joined us, fully dressed in a polo shirt and long skirt, proffering heaping plates of food.

"I cooked," she exclaimed, proudly serving her guests.

The meal was a delicious stew of potatoes, chayote, onions, and spices. I was only able to identify the chayote after I asked what we were eating. Aline jumped to her feet, disappeared for a moment, and returned to plop a chayote on the coffee table in front of me. She called it something else, but I can't recall the Kinyarwanda name.


After our fabulous, filling meal of squash and potatoes, we took 100 or so more pictures with Aline and Diana and made motions to leave. But it was not goodbye. Our group grew in number with every home visit, and this was merely our first stop—and first meal.

If you're still not sure of your impact on these sisters, Dear Readers, know this: these girls' lives have been changed. Because of your generosity, they are now protected from the rain and from robbers, they can eat a full meal despite the weather, and they have a pride in their home that is visible on their faces. And this pride extends to others in their community. They are an inspiration to those around them, and the more their lives improve, the more they can do to help their friends and neighbors.

Okay, I'm going to cry again. Thank you, CHG readers, for your constant support of us, Aline, Ubushobozi, and the good you do wherever you go.

Wednesday, August 17, 2011

I Made Bread! It Was Easy. You Can Too.

You know when it's August, but your iPod thinks it's December, and it plays "Do They Know it's Christmas," and you find yourself silently mouthing "Tonight thank god it's them, instead of YOUUUUUUUUUUUUUU" at a nice Asian man who clearly thinks you're about to steal his bag of lychees?

I love that.

I also love bread, but have never in my whole puff attempted to make it until this summer, assuming it was roughly as complicated as re-wiring the Hadron Collider. Then, it dawned on me that, a few years ago, Mark Bittman  published a recipe for five-minute, idiot-proof, no-knead artisan bread. It's since been updated and refined by half the population of Guam, but the essentials are there: four ingredients, a bowl, a pot, and time. So I tried it myself, and whaddayaknow? It's the best. Seriously. In all seriousness. Squared. I will eat this and nothing else until I die, presumably, of choking on bread.

Here's how you make it. (Do it! We'll have a bread party.)

First, gather your ingredients. They are:
  • 3 cups of bread flour

  • 1 little packet of active dry yeast

  • 1 1/2 teaspoons salt

  • 1 1/2 cups lukewarm water

If you plan on making this baby a lot in the future, bite the $4 bullet and purchase a package of yeast from CostCo or something. It is approximately four billion times cheaper than buying it envelope by envelope, a.k.a What I'm Currently Doing.


Second, you get a large, non-reactive mixing bowl and combine your dry ingredients, a.k.a. The Ingredients You Didn't Get From the Tap.


Third, add water and stir until it becomes a spongy, dough-like mass, a.k.a. Mr. Squishy. Don't overstir, or something bad will happen. I'm not exactly sure what, but aren't you scared now?


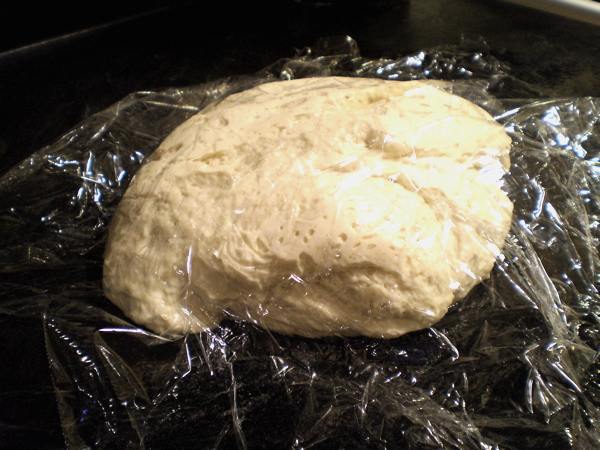
Fourth, cover that baby. With plastic and rubber bands. Then, leave it out for at least four hours, but for as long as several days, refrigerating after those first 240 minutes. (Note: The longer it sits, the better it will taste. I've gone up to three days.) If you have a cat that's prone to eating dough (er, not that I know any cat like that) ...


... hide it somewhere, like the Cave of Caerbannog, where it will be guarded by a rabbit so foul, so cruel, that no man (or cat) has yet fought with it and lived.


A cabinet will also be sufficient.

Eventually, your dough will expand like crazy, to about three times its former size. It will also appear softer and slightly wetter. (Note cat in lower part of photo, stalking wet dough for potential lunching. His lobotomy is scheduled for tomorrow.)


Fifth, cover a clean cooking surface (a counter, mayhaps) with a thin sheen of olive oil. Turn the dough out on to the surface, and fold it over two or three times. Cover everything with plastic wrap, and let it sit at least 30 minutes, but for up to 2 hours. If it's been refrigerated, it must be given enough time to come to room temperature. It must!


Sixth, while the dough lounges around, move your oven rack to the lower third of your oven. Then, preheat that sucker to 450 degrees F. Grab a pot or Dutch oven, cover it, and stick it in there, to warm along with the oven.

This is mine. It's a 3-quart hard anodized piece of Calphalon, but I'm fairly sure any sizable, oven-safe covered pot will do. (Have doubts about yours? Look it up on the interwebs.)


Seventh, once everything is good to go, CAREFULLY remove the hot pot from the oven and VERY CAREFULLY place the dough into it. SUPER CAREFULLY cover it, and COLOSSALLY CAREFULLY place it back into your oven. Bake for 30 minutes. I CAN'T EVEN EXPRESS HOW CAREFULLY YOU SHOULD remove the cover. Bake an additional 15 minutes, or until the top of your bread is nicely browned. If you see it starting to burn, get it out of there.

Eighth, flip the bread out on to a wire cooling rack. It should look something like this:


And one more time, in black and white, for posterity:


Ninth, once it's cool enough to handle, eat that bread. It may seem like a big loaf at first, but I promise on all that is good and pure, none of it will go to waste. Here's the above loaf, 30 seconds later:


And finally:


Happy baking!

Friday, July 22, 2011

Little Expense, Big Savings: What's Your Favorite Frugal Buy?

We purchased this toothpaste squeezer doohickey for $0.99 cents about four months ago: 


Since then, we're buying way less toothpaste. It should save us quite a few bucks in the long-term, too, provided we don't lose it / the cat doesn't eat it / it doesn't get sucked into the sweltering pit of despair we call "outside right now."

Which leads us to this softball question for a fiery Friday:

Sweet readers, what's your favorite frugal buy?

Do tell! Pass it on!

Wednesday, July 20, 2011

Why and How to Freeze Blueberries

Ahh, summer. Full of hazy days, humid nights, and lots and lots of blueberries. Those sweet orbs of azure joy are welcome anytime of year, but especially right now, when they provide a fruitacular (fruitacular?) balm for the grossest weeks of summer.

That's a flowery way of saying that blueberries are currently on major sale at both my supermarket and Costco, going for about $0.16/ounce. That's just about as cheap as they'll get around here, and I want to preserve the bounty for the winter months. (That's when I  crave blueberry pancakes, but have to usually settle for acorn squash pancakes. It's just not the same.)

Fortunately, freezing blueberries for future use is easy as (blueberry) pie, and a heckuva lot cheaper than buying off-season ones come January. All you need to do is follow these simple steps. You'll thank me come Christmas (because surely, there's no one more deserving of expensive gift-like things than a babble-prone, extremely lax blogger you barely know.)

Anyway, let's get to it. 

Step 1: Cut a hole in the box. Buy an Ark-of-the-Covenant-sized carton of blueberries from your local farmer's market, big box store, or preferred fruit venue.


Step 1.5: Get some freezer baggies while you're at it. Honestly, they're nice to have around, regardless. Tom Bosley was right on.


Step 2: Take a picture that you may someday use as a computer background. Make sure it is well-lit and in focus, so people (note: your mom) think(s) you're super awesome.


Step 3: Measure out your desired amount of blueberries. It could be in cup or half-cup increments, or by weight. Whatever you prefer. For my own nefarious purposes, I did eight ounces at a time.

Step 4: Place the blueberries on a small baking sheet. Stick that sheet right in your freezer.

NOTE: Blueberries are weird in that you should generally wait to wash them until right before using 'em. Less mushiness that way.


Step 5: Freeze for a few hours. Overnight is best.

Step 6: While the freezing process is occurring, watch the finale of Friday Night Lights and contemplate your values. Hope that someday you may make Coach Taylor proud.


Step 7: Once berries are frozen through, pour them into a freezer-safe Ziploc baggie. Get as much air out as possible, using a straw or your purty, purty mouth. Then, label that sucker.

NOTE: You do not have to write "Frozen Blueberries," as so brilliantly demonstrated here. Odds are you'll know they're frozen when you remove them from ... wait for it ... yep, the freezer.


And that's pretty much it. The blueberries should keep for a couple of months this way. (If you start seeing major freezer burn or frost buildup, it's probably a pretty good indication they should be used soon.) Try them in smoothies, crisps, or the aforementioned flapjacks. Viva la France!

Tuesday, July 19, 2011

Throwback: 68 Cheap, Healthy No-Cook Recipes

Sweet readers! Something new coming late today, but I figured this was a good time to re-post this one from last year. Enjoy, and stay cool.

Alas, CHG’s No-Cook month is slowly coming to an end. It’s been a joyous, ovenless journey, sweet readers, and we couldn’t have done it without the blistering sun or the stifling humidity. Thanks, Mama Nature.

Article-wise, we’ve already discussed 13 Ways to Cook without an Oven as well as 18 No-Cook Meal Ideas. This week, we’re giving you the actual recipes: 68 inexpensive, nutritionally sound dishes you can make without ever lighting anything on fire. (Hopefully.)

Each one of these links comes from either Cheap Healthy Good or my weekly Healthy & Delicious column over at (newly redesigned!) food dynamo Serious Eats. This means three things: A) we know they work, B) there are pretty pictures involved, and C) um … turns out there were only two things.

Enjoy, everybody! And as always, if you know of a really great no-cook recipe not mentioned here, please (please) add it to the comment section.

DIPS AND SPREADS
Black Bean Dip
Blueberry Salsa
Green Garlic and Garlic Scapes Pesto
Guacamole-Bean Dip Mashup
Lemony Hummus
Mango Salsa
Pesto (Don't toast pine nuts.)
Seven-Layer Taco Dip
Tomatillo and Yellow Tomato Salsa
Tomatillo Guacamole
Tomato Avocado Salsa
White Bean Dip

CONDIMENTS
Creamy Caesar Dressing
Grasslands Herb Salsa
Horseradish Mustard
Lemon-Ginger Dressing
Spicy Brown Mustard
Vegan Mayo
Vegan Worcestershire Sauce

COLD SOUPS
Buttermilk Cucumber Soup
Cantaloupe Soup
Fruit Gazpacho
Summertime Gazpacho

GREEN SALADS
Chlorophyll and Awesomeness Salad
Chopped Salad
Grape and Feta Salad with Rosemary
Grapefruit and Avocado Salad (Skip toasting almonds.)
Relaxed Kale and Root Veg Salad
Strawberry and Avocado Salad

MAINS, NON-GREEN SALADS, AND SIDES
Autumn Apple Salads
Basil Tofu Salad
Beet and Cabbage BBQ Slaw
Black-Eyed Pea “Caviar”
Black-Eyed Pea Salad
Chickpea Salad
Daikon/Jicama Mango Slaw
Greek Antipasto Pita
Greek Salad Skewers
Greek-Style Chickpea Salad
Greek Tofu Salad
Herbed Tuna in Tomatoes
Marinated Mushroom Salad
North African-Style Chickpea Salad
Orange Yogurt
Peach, Tomato, and Basil Salad
Refrigerator-Pickled String Beans
Sprouted Grains
Sublime Fruit Salad and Mint
Summer Panzanella (Bread Salad)
Watermelon and Feta Salad with Mint
White Bean and Roasted Red Pepper Wraps with Spinach
Yellow Tomato Salad with Roasted Red Peppers, Feta, and Mint
Zucchini Carpaccio with Feta and Pine Nuts

DESSERTS AND SNACKS
Cantaloupe with Honey and Lime
Chocolate Cherry “Ice Cream” Popsicles
Date Coconut Balls
No-Cook Berry Crisp
Plums with Orange and Mint
Strawberries with Balsamic Vinegar
Strawberry Mousse
Tamarind-Blueberry Granita
Three-Ingredient Banana, Honey, and Peanut Butter Ice Cream

DRINKS
Basil Lemonade
Cranberry and Blackberry Champagne Punch
Mango Lassi
Mojitos
Sweet Lassi
White Sangria with Fresh Fruit Ice Cubes

Cherry Lemonade, Limeade, and White Peach Bellinis are all delicious, as well, but require simple syrup. There are ways to make it without using heat, but these three recipes all include a boiling step.

And that's it. Readers, any suggestions? We would love to hear.

~~~

If you like this article, you might also be over the moon for:

 
Design by Free Wordpress Themes | Bloggerized by Lasantha - Premium Blogger Templates